Have you ever sent an email and then instantly regretted it? Maybe there was a typo, or you sent it to the wrong person? Don’t worry, you can still fix it! In this post, we’ll show you how to recall an email in Outlook quickly and easily. This guide will walk you through the simple steps to undo that mistake before the recipient reads it.
Remember, how to recall an email in Outlook only works in certain situations. You need to be using the Microsoft Outlook desktop app, and both you and the person you’re sending the email to must have a Microsoft 365 or Exchange account. Plus, the email must still be unread for the recall to be successful. If you’re ready to fix your email mistakes, let’s get started!

How to Recall an Email in Outlook: A Simple Guide to Fix Your Mistakes
Have you ever sent an email and wished you could take it back? Maybe it had a mistake, or you sent it to the wrong person by accident. Well, if you’re using Microsoft Outlook, you may have a chance to fix that mistake with the how to recall an email in Outlook feature! This feature helps you take back an email before the recipient reads it, so don’t worry; you still have a chance to fix it!
To use the how to recall an email in Outlook feature, you need to follow some easy steps. First, you need to make sure you’re using the desktop app for Outlook, as this won’t work in a web browser. You also need to be using a Microsoft 365 or Exchange account, and both you and the recipient need to be in the same organization. If everything checks out, you can get started right away!

Step-by-Step Process for Recalling an Email in Outlook
To begin, let’s talk about the steps you need to follow for recalling an email in Outlook. It’s really easy if you follow the instructions correctly. Here’s what you need to do:
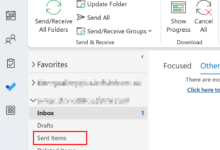
- Open the Sent Items folder in your Outlook.
- Find the email you want to recall and double-click on it.
- Click on the File tab at the top of the window.
- Select Resend and Recall, then choose Recall This Message.
Once you select Recall This Message, you’ll have two choices:
- Delete unread copies of this message
- Delete unread copies and replace with a new message
Make your choice and click OK. If you want to replace the email with a corrected one, you can go ahead and edit it before sending it again.
Things You Need Before You Recall an Email in Outlook
Before you get started with recalling an email in Outlook, there are a few important things to keep in mind. These things are important to know because they will decide whether you can recall your email or not.
- You must be using the Microsoft Outlook desktop app, not the web version.
- The email must be unread by the recipient. If the recipient has already opened it, you can’t recall it.
- Both you and the recipient need to have a Microsoft Exchange or Microsoft 365 account in the same organization.
If you meet these requirements, you’re all set to try recalling your email. If not, unfortunately, you can’t use this feature.
What Happens When You Successfully Recall an Email in Outlook?
If the recall is successful, your email will be deleted from the recipient’s inbox. If you chose to replace the email, the recipient will receive the new version instead. This can help save you from embarrassing mistakes!
If you have selected the option to get notified about the recall’s success or failure, you will be notified in a short time. This can help you know whether the email was successfully recalled or not. If the email wasn’t successfully recalled, you can always send a follow-up message to explain the mistake.
Can You Recall an Email in Outlook After It’s Been Read?
Unfortunately, how to recall an email in Outlook will only work if the email is still unread. Once the recipient opens the email, your recall request will not work. This is why it’s important to act quickly if you notice a mistake right after sending your email.
If the email has been read, you can’t recall it. In this case, the best option is to send a follow-up email apologizing for the mistake and explaining the error. It’s a simple way to fix the problem.
How to Set Up Outlook to Easily Recall Emails in the Future
To make recalling emails easier in the future, you can set up a few options in Outlook. One way is to make sure your email account is properly set up to use the recall feature. If you’re unsure, check with your organization to ensure you’re using Microsoft Exchange or Microsoft 365 accounts, which support this feature.
Additionally, always make sure to review your emails carefully before sending them. This can help reduce the chances of mistakes that will require recalling emails later.

Conclusion:
In conclusion, the how to recall an email in Outlook feature can be a lifesaver if you send an email by mistake. However, it has some limitations, like only working with unread emails and when both you and the recipient are on Microsoft Exchange or 365 accounts within the same organization. But don’t worry, if the email has already been read or you can’t recall it, sending a quick follow-up message is always a good solution!
Remember to act fast if you need to recall an email, as the feature only works with unread emails. And always double-check your emails before hitting “send” to avoid making mistakes in the first place. With these tips, you can send emails with confidence!
FAQs:
Q: How do I recall an email in Outlook?
A: Open the Sent Items folder, double-click the email, click File, then Resend and Recall, and select Recall This Message.
Q: Can I recall an email in Outlook after it’s been read?
A: No, you can only recall an email if the recipient hasn’t opened it yet.
Q: What accounts work with email recall in Outlook?
A: The recall feature works if both you and the recipient are using Microsoft Exchange or Microsoft 365 accounts within the same organization.